Babel自定义插件
上篇文章我们讲了 Babel的编译原理,本文就和大家一起来尝试用Babel自定义插件吧。本文你将学会开发插件的基本流程、以及如何开发一个插件
本文只是对Babel插件开发流程做一个引导,学会本文并不代表可以完全掌握Babel插件开发,Babel插件开发需要研究不同的场景,不断练习
小贴士
文章中涉及到的代码示例你都可以从 这里查看
环境搭建
为了方便插件开发我们先来搭建一个项目骨架,这个骨架基本上在Babel插件开发中都是可以使用的,这里就不多赘述了
typescript
typescript是前端开发中非常常用的语言,在Babel插件开发中,我们使用typescript来编写我们的插件代码,能增强插件健壮性降低错误率,提高开发效率
➜ npm install -D typescripttsx
tsx是直接运行Typescript的命令行工具,这样我们就不需要在编译TS后再运行JS了
➜ npm install -D tsxbabel工具链
前几篇文章大家也知道了Babel由多个工具包组成,每个包都发挥着独特的职责。在Babel插件开发中,通常只需要安装以下几个包即可
➜ npm install @babel/core @babel/types除此之外还有几个重要的辅助工具软件包:@babel/helper-module-imports、@babel/helper-plugin-utils等等
➜ npm install @babel/helper-plugin-utils
➜ npm install @babel/helper-module-imports这些包都可以在Babel的官网找到
插件骨架
以上环境都准备好后,来写下插件的基本代码结构。这里我们创建一个plugin.ts,代码内容如下:
import { declare } from "@babel/helper-plugin-utils";

export const YourPluginName = declare(
  ({ assertVersion, types, template }) => {
    assertVersion(7);

    // 逻辑 ...
    return {
      name: "YourPluginName",
      visitor: {},
    };
  }
);由于tsx的加持我们可以直接使用常用的ESModule语法来开发插件
现在我们再来建一个test.ts文件来测试我们的插件是否符合预期,代码内容如下:
import { transformSync } from "@babel/core";
import { YourPluginName } from "./plugin";

const code = `
  // 待测试代码,随意调整...
  function log(msg) { console.log(msg) }
`;

const result = transformSync(code, {
  plugins: [YourPluginName],
});

console.log(result.code);
eval(`${result.code}; log("Hello World!")`);逻辑就是使用@babel/core来编译上面的code测试代码,查看转义后的代码是否符合预期,最后使用eval来执行编译后的代码,查看是否能正常执行
综上我们就完成了babel插件开发的骨架结构,大致结构如下:
babel-plugin-demo/
├── plugin-A/       #  插件A
│   ├── plugin.ts   #  插件代码
│   └── test.ts     #  测试代码
├── package.json
└── tsconfig.json箭头函数转化
本文就先来试一下箭头函数转化这个实现,这里推荐开发插件时遵循以下思路:
- 待转换的代码有哪些
- 这些代码有哪些共同规则
- 目标代码是什么规则
总结的比较笼统,具体是什么样的,我们来看
待转换代码
首先第一点要明确我要转换什么,也就是源代码是长什么样的!
这里我们要转换箭头函数,所以要尽可能的将所有的箭头函数情况列举出来:
// 直接表达式,无代码块
const log1 = () => null;
// 有代码块
const log2 = () => {
  console.log('log2');
  // return ...
}
// 匿名函数
(() => null)();
// 作为属性
const obj = {
  log: () => null
}
// 等等...待转换的规则
接着打开AST Explorer,输入上面代码,查看AST结构分析我们该转换什么,换句话来说转化的规则是什么❓
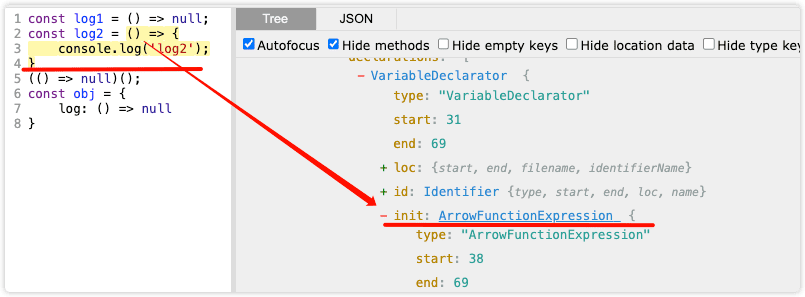
可以看到所有的箭头函数都是ArrowFunctionExpression节点,那么我们就可以在babel的visitor中通过ArrowFunctionExpression属性来捕获到这些节点
然后我们再查看一下ArrowFunctionExpression节点的属性,也就是箭头函数的内部结构

会发现的箭头函数的body有的是BlockStatement节点,有的是Expression/Literal节点等等。心细的你应该会察觉到,除了BlockStatement节点内部的节点是个数组外(也就是代码块内部有什么代码节点),其余的都是单个节点
目标规则
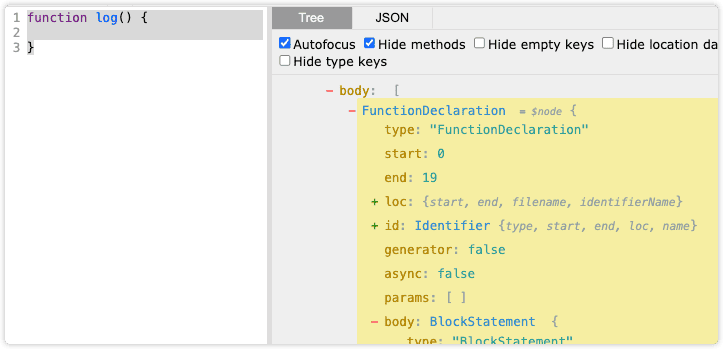
那么我们目标代码应该如何转化呢?通常转换成的普通函数都是function xxx() {},AST Explorer中查看
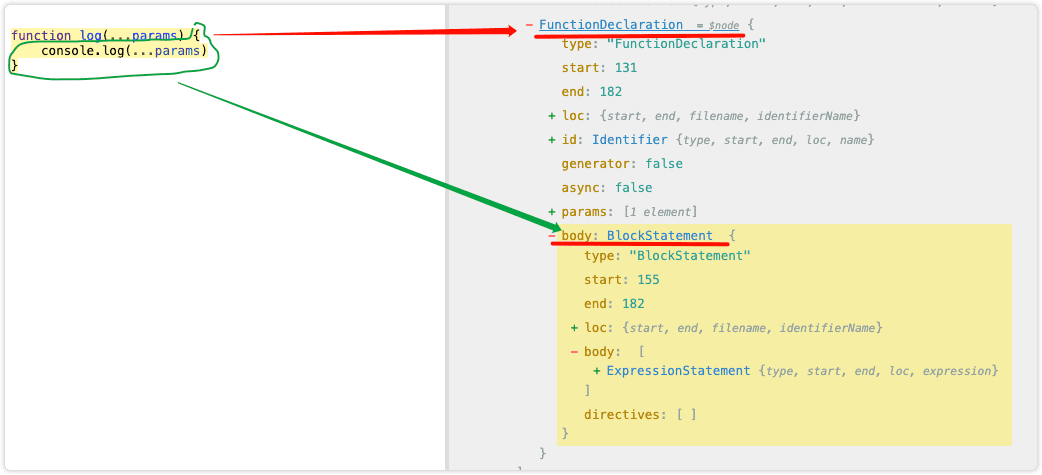
可以总结2点:
- 普通函数的节点为
FunctionDeclaration - 普通函数体为
BlockStatement节点
通过普通函数和箭头函数的AST节点对比后,不难得出需要将ArrowFunctionExpression节点转化成FunctionDeclaration,并将函数体转化成BlockStatement节点
插件实现
export const TransferArrowFunctionPlugin = declare(
  ({ assertVersion, types, template }) => {
    assertVersion(7);

    return {
      name: "TransferArrowFunctionPlugin",
      visitor: {
        // 捕获到箭头函数节点
        ArrowFunctionExpression(path) {
          const { node } = path;

          let body = node.body;

          const params = node.params;
          const generator = node.generator;
          const async = node.async;

          // 判断箭头函数的body是否是BlockStatement节点
          // 不是的话创建blockStatement节点,并将原来的body放入returnStatement节点
          if (!types.isBlockStatement(body)) {
            body = types.blockStatement([types.returnStatement(body)]);
          }

          // 将箭头函数替换成普通函数节点 functionExpression
          path.replaceWith(
            types.functionExpression(null, params, body, !!generator, !!async)
          );
        },
      },
    };
  }
);上面主要用到了types.isBlockStatement来判断节点、types.blockStatement创建节点、replaceWith来替换节点、types.functionExpression来创建普通函数节点
对于初学者可能需要花些时间去熟悉这些方法,还好我们是基于Typescript环境,读者可以在coding时可以直接看到它的类型提示,因此参数什么的还是很方便的
现在我们来试下是否符合预期,在test.ts中引入当前插件,然后编写测试代码
const code = `
  const log = (...args) => {
    console.log(...args);
  }

  const log2 = (...args) => true && ({...args});

  (() => console.log("I am IIFE"))();
`;

const result = transformSync(code, {
  plugins: [TransferArrowFunctionPlugin],
});

console.log(result!.code);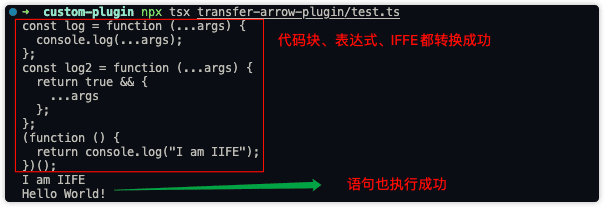
eval(`${result!.code!}; log("Hello World!")`);现在我们执行npx tsx test.ts看看执行结果:
基本逻辑完成后就可以考虑其他一些问题了,比如:箭头函数不能被new、是否异步等等
上面的代码如果我们使用new (() => null)在转换执行后并不会报错,因此需要添加判断
可以在函数体内插入一条判断,当判断是在new时直接报错
visitor: {
  ArrowFunctionExpression(path) {
    // ...省略其他

    let name = null;
    const ids = path.parentPath.getBindingIdentifiers();
    if (Object.keys(ids).length > 0) {
      name = ids[Object.keys(ids)[0]].name;
    }

    // 创建是否new判断if语句
    const banNew = template(
      `if (new.target) throw Error("${name || 'intermediate value'} is not a constructor")`
    )();

    if (!types.isBlockStatement(body)) {
      body = types.blockStatement([types.returnStatement(body)]);
    }

    // 将new判断插入到代码块的首行
    body.body.unshift(banNew as Statement);

    // 省略其他...
  },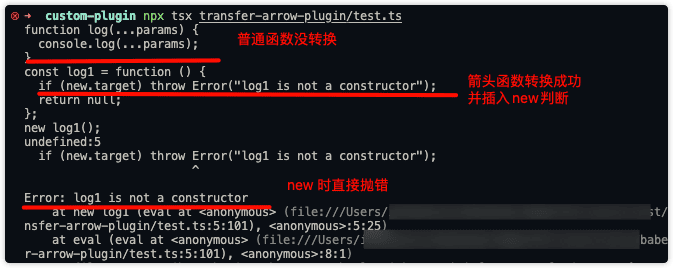
},再来测试下new箭头函数的情况
// 调整测试代码
const code = `
  function log(...params) { console.log(...params) }
  const log1 = () => null;
  new log1();
`;再次编译运行查看结果
除此之外还可以添加自定义的一些逻辑,读者可以自行发挥
异常捕获
现在来看第二个插件,自动捕获异常。什么意思呢?
假设我们有一个函数,在函数体中执行了异步操作,如果执行过程中抛出了异常,那么这个异常会直接抛出,导致后续代码无法执行,因此我们需要在函数体中捕获异常,并抛给调用者做一些相关处理等等
待转换代码
首先我们先看看需要转换的代码,因为是基于函数调用,因此知道转换的节点是FunctionDeclaration
目标规则
因为要自动捕获异常,需要使用try/catch语句包裹。来看下一个完整的try/catch语句的AST结构
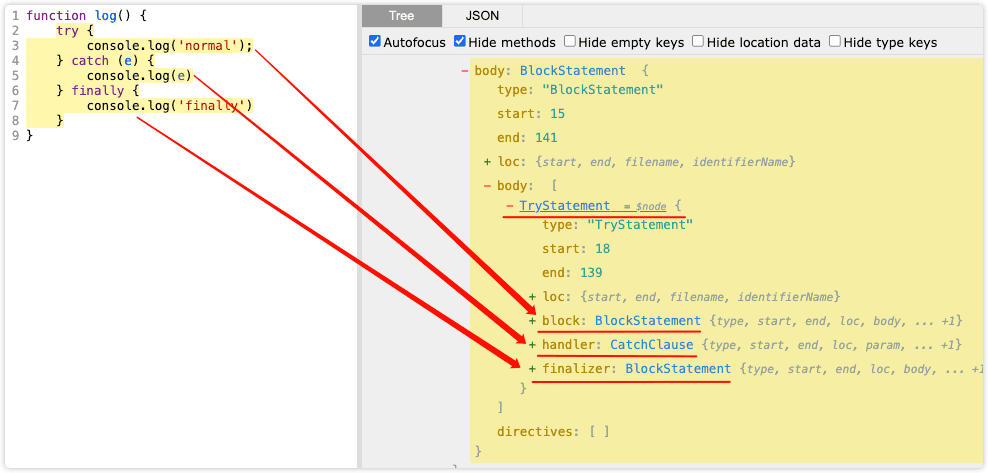
从AST结构中可以发现,try/catch语句的节点为TryStatement,try节点的body节点为BlockStatement,catch节点的body节点为BlockStatement,finally节点为BlockStatement
因此我们需要将FunctionDeclaration节点转化成TryStatement节点,并将FunctionDeclaration节点的body节点放入TryStatement节点的body节点,然后再生成catch节点和finally节点
插件实现
export const AutoTryCatchPlugin = declare(
  ({ assertVersion, types: t, template }, opts) => {
    assertVersion(7);

    // 默认错误处理函数模板
    const defaultHandler = template(`
      console.error(ERROR);
      throw new Error('捕获到错误:' + ERROR.message);
    `);

    return {
      name: "TryCatchPlugin",
      visitor: {
        Function(path) {
          const { node } = path;

          // 生成唯一错误标识符,也就是catch的参数
          const errorIdentifier = path.scope.generateUidIdentifier("e");

          let body = node.body;

          // 这里首先将函数体转换成blockStatement
          if (!t.isBlockStatement(body)) {
            body = t.blockStatement([t.returnStatement(body)]);
          }

          // 构建try/catch结构
          // 这里根据类型提示可以很快创建对应参数
          const tryStatement = t.tryStatement(
            body,
            t.catchClause(
              t.identifier(errorIdentifier.name),
              t.blockStatement(buildHandlerBlock(errorIdentifier.name))
            ),
            // 这里finally语句直接返回null
            t.blockStatement([t.returnStatement(t.nullLiteral())])
          );

          // 替换函数体卫try/catch结构
          node.body = t.blockStatement([tryStatement]);
        },
      },
    };

    function buildHandlerBlock(error: string) {
      return defaultHandler({ ERROR: error }) as Statement[];
    }
  }
);现在我们尝试下这个插件,在test.ts中引入插件,然后编写测试代码
const code = `
  const log = (...args) => {
    try {
      console.log(...args);
    } catch (e) {
      console.error(e);
    }
  }

  (() => null)();
`;

const result = transformSync(code, {
  plugins: [AutoTryCatchPlugin],
});

console.log(result!.code);
eval(`${result!.code!}; log("Hello World!")`);使用npx tsx test.ts执行测试,看看结果
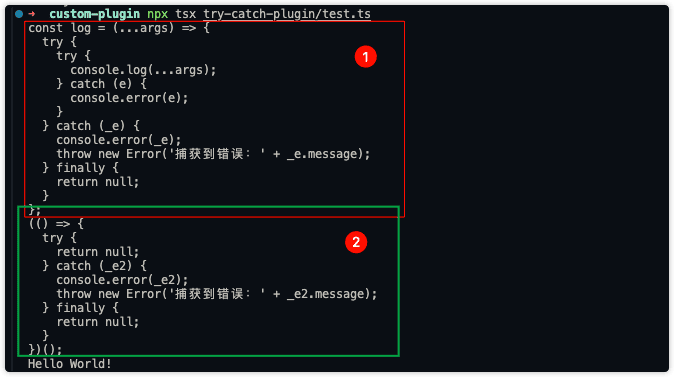
可以看到确实都包裹了try/catch/finally结构,代码结构基本上没有问题,执行结果也正常。但有一个问题就是发现①中的源代码中本来就包含了try/catch结构,结果却依然被包裹了一层try/catch结构,这肯定是有问题的
那么如何解决呢?首先都是函数体中,要多判断一次当前函数节点是否存在TryStatement这种节点,如果存在,则不进行包裹,否则进行包裹
function containsTryCatch(path: NodePath) {
  let hasTryCatch = false;

  // 当前节点遍历子节点是否存在TryStatement
  path.traverse({
    TryStatement(p) {
      hasTryCatch = true;
      p.stop();
    },
  });

  return hasTryCatch;
}

{
  name: "TryCatchPlugin",
  visitor: {
    Function(path) {
      const { node } = path;

      // 跳过已包含try/catch的函数
      if (containsTryCatch(path)) return;
    },
  },
};再来跑一次看看执行结果:
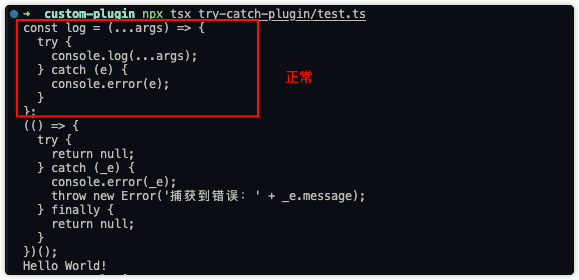
这下就没问题了。假如现在开发者有需求,有些函数就不想自动包裹try/catch,这时候就需要判断根据一些标识来跳过当前函数了,有哪些方式可以表示呢?
- 以固定的字符串开头的函数跳过
- 有固定的注释跳过,类似于eslint那些
@ts-ignore
Babel的插件允许用户使用时传入一些参数,在插件执行时可以拿到这些参数,比如:
{
  plugins: [[YourPlugin, { /** 参数 */ }]]
}在插件中可以在顶部的options中或者state中拿到插件的参数
为了代码健壮性,我们创建一个选项接口
interface IPluginOptions {
  // 可以传入不需要执行的函数名 正则
  exclude?: RegExp[];
}在插件定义中使用IPluginOptions:
export const AutoTryCatchPlugin = declare<IPluginOptions>(
  ({ assertVersion, types: t, template }, opts) => {
    assertVersion(7);

    // 默认错误处理函数模板
    const defaultHandler = template(`
      console.error(ERROR);
      throw new Error('捕获到错误:' + ERROR.message);
    `);

    return {
      name: "TryCatchPlugin",
      visitor: {
        Function(path) {
          const { node } = path;

          // 跳过已包含try/catch的函数
          if (containsTryCatch(path)) return;

          // 白名单
          if (shouldSkip(path, opts.exclude)) return;

          // 省略其他...
        },
      },
    };

    function buildHandlerBlock(error: string) {
      return defaultHandler({ ERROR: error }) as Statement[];
    }

    function shouldSkip(path: NodePath, excludePatterns: RegExp[] = []) {
      const { node } = path;
      // 通过注释跳过
      // 判断当前是否存在 @no-try-catch 注释,有直接跳过
      if (
        node.leadingComments?.some((c) => c.value.includes("@no-try-catch"))
      ) {
        return true;
      }

      if (excludePatterns?.length === 0) return false;

      // 通过名称匹配
      const functionName = getFunctionName(path);
      return excludePatterns?.some((pattern) =>
        new RegExp(pattern).test(functionName)
      );
    }

    function getFunctionName(path: NodePath) {
      const { node } = path;
      if (t.isFunctionDeclaration(node)) {
        return node.id?.name || "anonymous";
      }
      if (t.isArrowFunctionExpression(node) || t.isFunctionExpression(node)) {
        // @ts-ignore
        return path.parent?.id?.name || "anonymous";
      }
      return "unknown";
    }
  }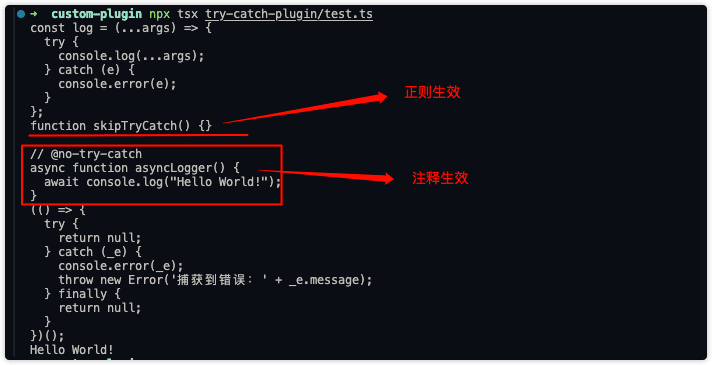
);现在我们调整下测试代码:
const code = `
  const log = (...args) => {
    try {
      console.log(...args);
    } catch (e) {
      console.error(e);
    }
  }

  function skipTryCatch() {}

  // @no-try-catch
  async function asyncLogger() {
    await console.log("Hello World!");
  }

  (() => null)();
`;

const result = transformSync(code, {
  // 这里传入 以 skipTry 开头的函数不需要 try catch
  plugins: [[AutoTryCatchPlugin, { exclude: [/^skipTry.+/i] }]],
});

console.log(result!.code);
eval(`${result!.code!}; log("Hello World!")`);重新执行测试:
到这里此插件就基本结束了,当然你可以补充其它代码,实现更复杂的功能,比如:自定义错误逻辑等等
调试
一般设计到复杂的插件开发时,都需要不断地测试逻辑是否正确,或者说想看一些状态信息。传统的console太过麻烦也会影响插件代码,通常建议使用debug来调试插件
插件调试也很简单,和普通的node程序调试一样,这里推荐使用vscode调试
创建launch.json文件后,生成以下配置:
{
  "version": "0.2.0",
  "configurations": [
    {
      "name": "Test Babel Plugin",
      "program": "${workspaceFolder}/try-catch-plugin/test.ts",
      "request": "launch",
      "runtimeExecutable": "tsx",
      "skipFiles": [
        "<node_internals>/**"
      ],
      "type": "node"
    },
  ]
}关于vscode调试就不多赘述了,更多信息可以翻阅往期文章 VSCode调试技巧
测试
在发布一款软件包时通常都会进行严格的测试用例,以保持软件的质量。代码的测试有很多种方式,比如常见的单元测试Jest等等,这里也可以使用Jest进行测试,判断AST节点信息或者生成代码后的信息对比,测试流程还是比较简单,可参考往期文章Jest单元测试
这里提供个快速测试babel的工具babel-plugin-tester
➜ npm install -D jest babel-plugin-tester因为我们使用到了ts,因此我们需要使用ts-jest
➜ npm install -D ts-jest创建jest.config.ts配置文件:
export default {
  preset: 'ts-jest',
  "testMatch": ["**/__test__/**/*.ts"]
}这里我们将所有的测试文件都放在__test__文件夹下,因此配置testMatch为**/__test__/**/*.ts
创建__test__/index.ts文件
import { pluginTester } from "babel-plugin-tester";
import { TransferArrowFunctionPlugin } from "../transfer-arrow-plugin/plugin";

pluginTester({
  plugin: TransferArrowFunctionPlugin,
  tests: [
    {
      title: "Test1",
      code: `
        const a = () => {
          console.log('hello')
        }
      `,
      snapshot: true,
    },
    {
      title: "Test2",
      code: `
        const a = () => {
          console.log('hello')
        }
      `,
      output: `
        const a = function () {
          if (new.target) throw Error("a is not a constructor");
          console.log("hello");
        };
      `,
    },
  ],
});babel-plugin-tester使用方式有多种:
snapshot快照方式,每次对比快照,此种方式很简单- 对比输出代码,看是否相等
最后
Babel的插件开发远远不止这些,能实现的功能也很丰富,业界有很多优秀的插件可以借鉴,如:按需加载、自动国际化、代码高亮等等,读者感兴趣可以去官方仓库查看
感谢支持